Search This Blog

Showing posts with label 5th Grade. Show all posts

Sunday, April 13, 2014

Clay Flower Collage


5th graders learned about Georgia O'Keefe when making these clay flowers. The kids really liked Georgia O'Keefe's work, especially when they saw the cow skulls. Right now I'm calling it a collage because we are attaching them to the black paper. My students used white Crayola Model Magic and colored it with markers to make it change colors. Then they created the different pieces of the flowers. When they had all of the pieces of the flower, they would build them on the black paper and press down to make it stick. They had to have a minimum of 3 flowers and they had to be placed at the top of the page to leave room for the vase. I told them they could make the flowers all the same, or they could be all different. At the end they drew a vase on pieces of leftover cardboard I've had in the closet for years, and glued it to the bottom.


 So far, I'm really liking the results on these.


Friday, March 14, 2014

Winter Portraits!

It is technically still winter, even though it's March and we are on Spring Break. Our temps really haven't warmed up yet but I thought posting this project would be a great farewell to winter :)
I saw this project on Pinterest and knew I had to try it out. These were done on 12"x18" paper, and colored with markers. Students had the option of drawing scarves, or no scarves, gloves, or mittens. All students had their cup or mug of spmething warm to drink like hot chocolate. We discussed different lines, patterns, textures, and colors for their winter clothing.
All of them are by my 5th graders. :)


Monday, May 27, 2013

Paper Masks!

 5th and 6th graders made these great paper masks. Everything had to be made out of paper, and the mask had to be symmetrical. These were inspired from masks around the world. I love the uniqueness of each mask!


Sunday, April 7, 2013

5th grade Oil Pastel and Watercolor Sea Turtles

These are done in watercolor with an oil pastel resist. First, students draw the turtles, then they create a design on the shell. Next, they color it with oil pastels. Finally, they paint the background with watercolors in blue and green to get that ocean like water. I've also done it where they crumple their paper up before they paint. I've omitted that step the last few times they have done this because some students are a little bit rough on that step. My 5th graders did these with my long term sub when I was gone! I think they turned out great!


Wednesday, March 20, 2013

Pop Art on Scratch Art paper

My 5th graders finished up the project where they used scratch art paper to design a Pop Art artwork in the style of Andy Warhol. Each student had to come up with a symbol about them and tell me why they drew that symbol. Here are some great examples...


Thursday, March 7, 2013

5th Grade Projects

My 5th graders have been working so fast! I'm always trying to stay one step ahead of them because they finish their projects quickly.

The first one is a Lego Style Portrait. They had to create a Lego character, fill the page, and color the background. Unfortunately,I only got a few really great ones on the Lego style portrait.

The nerd Lego man was my favorite!


Next is a one point perspective project. You've probably seen it before:


 GREAT results on this project.

 And here is our version of Andy Warhol's art : Pop Art Scratch Art!
They had to draw a symbol that represents themselves and tell me why they drew it.


That's a paintbrush, if you can't tell :)

 AND finally the displays from our Fine Arts Festival:


Thursday, June 7, 2012

Robots

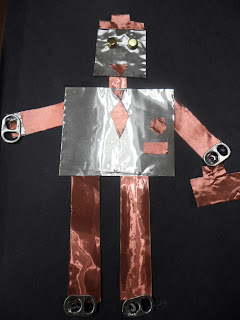
Towards the end of the school year, I had two different grade levels were working on robots at the same time. The 3rd graders did the robot drawings and the 5th graders made the metal robots. One thing I learned is that kids love robots!

These were the rules they had to follow for the 3rd grade robots:
1. Fill up the page
2. Include a background (No robots floating!)
3. Draw big (Must draw more than one if you draw small!)
4. Include details
5. Outline all of your pencil lines with a sharpie and don't leave very much white space when you color it.
6. Make the robot different from everyone else's

If I had to include another rule it would be to not have a triangle sun in the corner of the paper and not to color a blue line at the top of the page for the sky! :)
This was good practice for them to learn to fill the page, add details, and make a complete drawing. I think they were creative with their backgrounds and details. Here are some favorites...
Robot in Space!

Dancing Robots!

A lot of kids went with a space background

Robot and scientist working on him! love it!

Next are the 5th grade robots. This was the first time I did this. As with any project, I may be making some changes for the next time.
Here are the things they used:
1. Aluminum tooling foil or regular foil.
2. Coke can tabs or pop tops 
3. Brads
4. Scissors
5. Elmer's glue or tacky glue
6. Plastic baggies
7. Rulers
8. Hot Glue 
9. 9"x12" black construction paper

These were made from aluminum tooling foil that comes in the roll. You can cut it with regular scissors. It's copper on one side and silver on the other, so students had the option of making it one color or two. The great thing about the metal is that its thick enough where it won't rip and you can draw on it with a pencil to make designs, but its not too sharp where they are going to get cut. When we ran out, I used regular foil which was easier to glue, but also easier to rip.
They were given the same size rectangle of the metal to make all of the robot parts (body, arms, legs, head, neck), and four coke can tabs (two for hands, two for feet), two brads for eyes, and a plastic bag to keep all of their pieces.
On the first day they were given all of their materials and the black paper. They used their rulers and pencils to draw the shapes on the metal and cut out their pieces. They laid out the pieces on the black paper to see how to make the robot fit.
On the second and third days, they glued the pieces on with regular Elmer's Glue. You could also use tacky glue, but all we had was Elmer's and it worked fine. Going over it with a ruler helped and wiping up the glue that comes out the edges was important. One thing I emphasized with this one is good craftsmanship. The gluing can get messy if they don't take their time and clean it up. Next they poked the brads through the head of the robot to make the eyes (some needed help with this) and used all of their extra pieces for the details.
Finally I helped them glue on the hands and feet with hot glue. This part took some time, but I managed to get them all done on the last day they worked on it. Check them out...

Plain and simple robot
Robot and friend!

Business man robot!

Robot with top hat and cane!

Who doesn't love a robot, right?

Saturday, April 21, 2012

Last Art Show

These few photos are from the last art show we will have up for the school year. This is our annual vertical team show that features artwork from Elementary, Middle and High schools in our districts. We are broken up into teams based on our feeder schools. Our team's theme is portraits. I have our falling back self-portraits by 5th and the crazy hair self-portraits by 6th. This year it is at City Hall, which I think is pretty cool. I'll have to take some more photos of the portraits and the other teams' work. There are some great things that our students can do!


Monday, March 5, 2012

More Falling Back Self-Portraits!!

 Here are some more examples of the 5th grade Falling Back Self-Portrait. I think they turned out great!